Depth Guide: How to Choose the Most Suitable Materials for Your Laser Carving Project?
Picking a material may look like the easiest part of a laser carving project. You choose a piece of wood, acrylic, glass, leather, or metal, place it under the laser, and start the job. But anyone who has tested a few materials knows it is not that simple.
The same design can look crisp on anodized aluminum but barely visible on untreated stainless steel. A wood sign can look warm and handmade, or it can turn out with heavy burn marks around every letter. Acrylic can look clean and modern, but the wrong settings may leave rough edges. Glass can look elegant, but it can also crack if the heat builds up too quickly.
So the real question is not just, “Can this material be engraved?” A better question is, “Will this material give the look, strength, safety, and finish this project needs?” Once you answer that, the rest of the work becomes much easier.
Why Material Choice Matters for Laser Carving Results
Laser carving works by using a focused beam of light to change the surface of a material. Some materials darken. Some turn frosted. Some melt, smoke, crack, or show only a weak mark. This reaction affects the final color, engraving depth, edge quality, cleaning time, smell, and durability.
That is why material choice should happen before final design production. If the material is a poor match, adjusting speed and power may only fix part of the problem. A fine logo may look sharp on smooth acrylic but lose detail on rough leather. A serial number may stay readable on anodized aluminum but look too faint on the wrong metal surface.
Safety is also part of the decision. Some materials look harmless but can release unpleasant or harmful fumes when heated. Unknown plastics, coated boards, and synthetic leather should be checked carefully before use. A good laser carving project starts with a material that is suitable, safe, and matched to the machine.
Start with Your Laser Carving Project Goal
The best material is not always the most expensive one. It is the material that fits the job. Before buying sheets, blanks, tags, or panels, think about how the finished piece will be used. Is it a gift, a sign, a label, a display item, or something that needs to survive daily handling?
For creative gifts, the material should have character. Wood, bamboo, leather, and acrylic are popular because they each create a different feeling. A birch ornament feels simple and warm. A walnut desk sign feels more refined. A leather key tag feels personal. Clear or colored acrylic gives a cleaner, more modern look.
For business products, consistency matters more than charm. Logo gifts, nameplates, packaging tags, office signs, and display pieces need to look similar across a batch. If one sheet of wood engraves darker than the next, or one acrylic batch melts more easily, the final order may look uneven.
For functional marks, durability comes first. Tool labels, QR codes, serial numbers, equipment plates, and metal tags need to stay readable over time. These projects are less about decoration and more about clarity, wear resistance, and long-term use.
If you are still deciding what to make, browsing practical laser engraver project ideas can help you narrow the direction. Project examples make it easier to see whether wood, acrylic, glass, leather, or metal is the right starting point.
Common Laser Carving Materials and When to Use Them
Wood is one of the friendliest materials for beginners. It is often used for signs, ornaments, coasters, frames, gift boxes, packaging, and home decor. Basswood and birch plywood are easy to find and usually give clear contrast. Hardwoods such as maple, walnut, cherry, and oak can create a more premium finish. Still, wood can surprise you. Grain direction, resin, moisture, glue layers, and density can all change the final color and burn marks.
Acrylic is a strong choice for signs, displays, awards, nameplates, light panels, and modern decorations. Cast acrylic often gives a clean frosted look when engraved. Extruded acrylic may behave differently, especially around edges. Clear, colored, mirrored, and frosted sheets can also react in different ways. Acrylic can look polished, but too much heat may cause melting or rough edges.
Glass and crystal are great for cups, bottles, awards, wedding gifts, keepsakes, and decorative pieces. They can create a soft etched effect that looks elegant with names, dates, logos, and simple line art. The challenge is that glass can crack or chip. Thin glass, curved surfaces, and uneven thickness need lighter settings, stable support, and sometimes a rotary attachment.
Leather works well for wallets, notebook covers, patches, belts, key tags, and handmade accessories. Natural leather often gives a warm, dark mark that feels personal and crafted. But leather needs care. Unknown synthetic leather, vinyl leather, and PVC-based imitation leather should be avoided because they may melt or release harmful fumes.
Metal is better for durable tags, tools, jewelry, equipment labels, serial numbers, QR codes, and industrial marks. Stainless steel, aluminum, brass, anodized aluminum, and coated metals are common choices. The machine type matters here. CO2 lasers may work on treated or anodized surfaces, but fiber or UV lasers are usually better for fine metal marking.
Match the Material with the Right Laser Engraving Machine
Material and machine should be considered together. A beautiful material can still give poor results if the laser type is not suitable. CO2 lasers are often used for wood, acrylic, leather, paper, fabric, and many non-metal materials. Diode lasers are common for entry-level wood engraving, though they may be slower or less effective on thicker materials. Fiber lasers are often used for metal marking, serial numbers, jewelry work, and industrial tags. UV lasers can be useful for glass, crystal, selected metals, delicate plastics, and fine details with less heat impact.
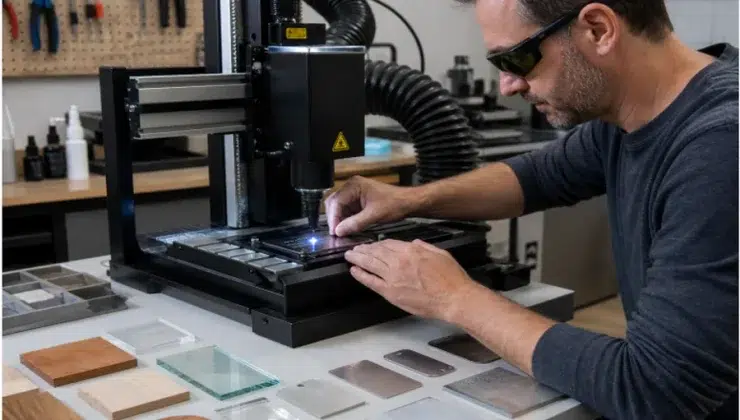
For creators, home studios, and small businesses working with different materials, choosing a suitable laser engraving machine can make testing more practical. A UV laser engraver, such as the Xlaserlab E3 UV Laser Engraver, is useful for projects that need fine marks on glass, crystal, coated metal, acrylic, leather, or small personalized products. A small studio may use wood for handmade signs, acrylic for display pieces, and metal tags for packaging labels. In that situation, the material should not be chosen separately from the machine. The right setup helps users compare surfaces, test settings, and decide which material gives the best balance of appearance, durability, and cost.
Quick Material Comparison Before Testing
Use this table as a first filter, not as a final rule. The same material can behave differently depending on thickness, coating, supplier, design style, and laser type.
| Material | Best Use | Main Risk | Testing Tip |
| Wood | Gifts, signs, decor | Burn marks, smoke | Test grain and moisture |
| Acrylic | Signs, displays | Melting or rough edges | Compare acrylic types |
| Glass | Cups, awards | Cracking | Start with low power |
| Metal | Tags, tools, jewelry | Weak marks if mismatched | Match material with laser type |
| Leather | Wallets, notebooks | Odor or unsafe synthetics | Use natural leather |
Materials You Should Avoid in Laser Carving Projects
Some materials are not worth the risk, even if they are cheap or easy to find. A plastic sheet, coated board, or imitation leather piece may look normal, but heat can change everything.
PVC and vinyl should be avoided. They may release toxic or corrosive gases when heated, which can be dangerous to breathe and may damage the machine. This includes vinyl sheets, PVC boards, some imitation leather, and unknown flexible plastics.
ABS, styrene materials, fiberglass, carbon fiber composites, phenolic resin materials, and resin-heavy boards also need caution. They may melt, smell bad, release harmful smoke, or leave sticky residue. Treated wood and unknown coated boards are risky too. Old painted boards, pressure-treated wood, reclaimed panels, and scrap materials may contain glue, paint, preservatives, or other unknown chemicals.
When the material source is unclear, skip it. A known, clean, laser-safe material is always the better choice.
How to Test a Material Before the Final Project
Testing saves time, money, and frustration. Even experienced users cannot always predict how a new sheet, blank, coating, or leather sample will react. A small test can show whether the mark is dark enough, whether the surface burns, whether the edge melts, whether the smell is too strong, or whether the final piece needs cleaning.
Start with a small sample from the same batch. For wood, check grain, smoke, burn marks, and color. For acrylic, check whether the edge stays clean. For glass, watch for cracks or chips. For metal, make sure the mark is clear and durable.
Adjust power, speed, focus, and passes step by step. Too much power can burn wood, overheat acrylic, or crack glass. Too little power may leave a weak mark. Several light passes are often safer than one aggressive pass, especially on delicate materials.
Keep a simple record. Write down the material name, thickness, supplier, power, speed, focus, passes, and result. A photo helps too. This habit is especially useful for small businesses because repeat orders become easier when the best settings are already saved.
Choose Materials by Budget, Skill Level, and Final Look
Beginners should start with materials that are affordable and easy to replace. Basswood, birch plywood, cardboard, paperboard, natural leather scraps, and simple acrylic sheets are good choices. Mistakes are part of learning, so it helps when each test does not cost much.
For premium products, choose materials that support a better finish. Walnut, cherry, anodized aluminum, glass, crystal, and high-quality acrylic work well for awards, wedding items, branded gifts, desk products, and jewelry packaging. These materials often need more careful handling, but the finished result can look more polished.
For small business production, consistency is the key. A material that looks good once may not be ideal for repeat orders if the supplier changes quality often. Before building a product line around one material, test several samples and check whether the material is stable in thickness, color, coating, and cleaning time.
Final Tips for Cleaner and Safer Results
Before starting the final job, check these points:
- Confirm the exact material name and composition.
- Avoid unknown plastics, coated boards, and synthetic leather.
- Use proper ventilation or an exhaust system.
- Keep the material flat and focused before engraving.
- Clean the surface before carving.
- Save your best settings for future projects.
Small habits prevent big problems. They can reduce burned edges, pale lines, unclear patterns, warping, strong odors, and unstable finished products. A clean result usually comes from careful preparation, not one lucky setting.
Conclusion: The Best Material Is the One That Fits the Project
The best laser carving material is the one that fits the project goal, visual style, machine type, safety needs, budget, and final use. Wood is great for warm handmade gifts. Acrylic suits modern signs and displays. Glass and crystal work well for elegant decorative pieces. Leather is useful for accessories and craft products. Metal is better for durable tags, tools, jewelry, and industrial marks.
A smart workflow starts with the project purpose, then moves to material choice, machine matching, safety checks, and sample testing. This order helps reduce waste, improve quality, and make each laser carving project more predictable.